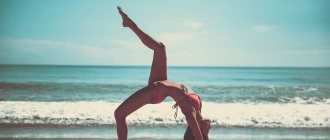
Stress accumulated during the working day manifests itself physically in the form of illnesses and ailments. You come home after work and your to-do list never ends. Very little time for self-care. But what if you set aside a little time every day for health and well-being? Sometimes it's important to focus on yourself. This will significantly reduce stress, prevent disease and slow down the aging process.
Try these yoga poses - they are simple, but after regular practice, the results will pleasantly surprise you. Stress levels will decrease, body flexibility will improve, and along with flexibility will come a feeling of well-being and inner peace.
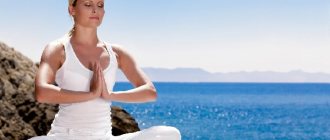
Mountain Pose (Tadasana)
This pose is one of the simplest, but it is not immediately possible to perform it perfectly.
Technique: stand straight, feet firmly on the floor, spread your toes wider. Legs, feet, ankles are connected. Tighten your buttocks so that your pelvis is over your feet. Tuck your stomach in and roll your shoulders back and down. Hands are lowered down with palms facing out. Close your eyes and stay in the pose for 5 to 10 breaths.
How to perform asanas for maximum relaxation?
Stay in each pose until you have taken 5 to 10 deep breaths. The slower you inhale, the greater the benefits of the asanas and the more noticeable the relaxation effect. From time to time you will be distracted from your practice. As soon as this happens, get rid of chaotic thoughts and return your attention to the air flow.
The healing effect of yoga is not only about relaxation. As you know, untrained body systems degrade, which can cause unreasonable feelings of anxiety and insomnia. Simple asanas strengthen the endocrine, nervous and other systems. Thanks to them, relaxation appears not only during classes, but throughout the day. By regularly practicing yoga, you will notice how your well-being has improved, your body has become stronger and your figure has become toned. You will get better sleep, and every morning will be cheerful and without coffee.
Forward Bend (Uttanasana)
This pose causes a rush of blood to the spine and head.
Technique: From a standing position, fold forward and reach your hands to your feet or ankles, or, if you find it difficult, to your hips or knees. Relax. Allow your lower back to lengthen and the crown of your head to hang towards the floor. The neck and shoulders are completely relaxed. Breathe deeply, and with each exhalation, pull your stomach towards your knees. Stay in the pose for 5 to 10 deep breaths.
Pigeon Pose (Eka pada rajakapotasana)
The pose is a great stretch for the hip joints, and is perfect for those who spend all day sitting at a desk or driving for several hours. The front of the thigh, back and hip extensors are stretched. If your back is not strong enough to stay in the position for more than a breath or two, don't be discouraged. Practice, and over time it will become easier for you to remain in this position.
Technique: Start sitting with one knee on the mat at a 90-degree angle. The second leg is straight and remains behind. If necessary, use a block under the hips. This will relieve some of the pressure and make balancing easier until flexibility improves. Mentally stretch from your lower back to the ceiling. Hold the pose for 5 to 10 breaths on each side and gradually increase the duration. Repeat on both sides.
Reclining Pigeon Pose (Eka Pada Rajakapotasana)
Deeply bending pigeon pose requires less effort and is more relaxing. Stay in it longer and breathe. The asana releases stress and tension in the hips and increases flexibility.
Technique: Start in the same position as pigeon pose and slowly lower yourself onto your palms or forearms onto the floor. If it becomes easy, fold your hands on top of each other and rest your forehead on your hands. Stay in this position for 5 to 10 breaths. Repeat on both sides.
Cobra pose (bhunjangasana)
This pose strengthens the back, opens the shoulders, chest, and strengthens the muscles along the spine.
Technique: from a prone position on your stomach, both palms under your shoulders, fingers spread wide, pelvis pressed against the mat, push off the floor with your hands and lift your chest up. Pull your shoulders away from your ears, lengthening your neck. Look up a little. Take a few breaths and slowly lower yourself to the starting position.
Yoga for the eyes: 7 effective exercises that will save you from stress and fatigue
During the pandemic, we've definitely been spending more time in front of screens.
Many of those who started working from home noted that the usual working hours have become somewhat variable, and sometimes you find yourself at the laptop at odd hours for work-related issues. And leisure options in certain months were significantly reduced - time spent walking was now taken up by Netflix series. In a word, the load on the eyes has increased, and their fatigue affects our general condition. In general, is it any wonder that at the beginning of 2021 the main wellness trend was... yoga for the eyes! Under the modern name, however, lies a technique familiar (but already forgotten) from childhood. Remember how in elementary school the teacher paused for finger exercises (“we wrote, we wrote, our fingers were tired!”) and eyes? Now the whole world is obsessed with the latest exercises. Let's join a new hobby, remember tips from childhood and learn new techniques that will help you relax and cope with stress. Yoga is truly a universal physical activity. Although many people find it boring, this set of exercises allows you not only to maintain muscle tone, but also brings relaxation. Essentially, yoga for the eyes works the same way.
You can combine eye yoga with classic yoga exercises or just use it as a little warm-up in between work. After all, it is especially useful for those who spend a lot of time in front of a laptop and stare at the screen for hours.
Sarah Jessica Parker in the series "Sex and the City"
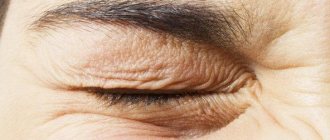
By regularly exercising your eyes, you can activate the muscles of the upper cervical spine and eliminate not only the symptoms of eye strain (asthenopia) that arise from working with a computer, but also the pain in the head and neck that arise from sitting at a desk for long periods of time.
The fact is that the suboccipital muscles are located at the back of the neck, just under the skull, and contain a huge number of proprioceptors that sense tension in the muscles to inform the brain about the position of the head and neck. In this way, the muscles of the whole body are coordinated so that we do not lose balance and do not fall out of the blue.
These muscles, in turn, respond to eye movement, and you can feel this yourself by placing your hands on either side of your head and placing your thumbs just below the edge of your skull at the back of your head. Feel the muscles without overstraining your neck and close your eyes, then move your eyes horizontally and vertically - you will feel small pulsating movements under your thumbs. This is the work of your suboccipital muscles, which receive information from your eyes.
When you sit at a desk almost motionless and stare at a screen for long periods of time, the range of movement of your eyes is limited, which limits the information your muscles receive. As a result, this leads to muscle tension in the neck and, conversely, eye strain.
So, below are some simple but effective exercises to combat this. At first, if you haven't done them regularly, you may feel a little dizzy, so do everything slowly. As with any other type of exercise, do not push yourself into an unattainable pace right away, but gain shape gradually.
Regular exercise will reduce eye fatigue and improve your posture, attention, coordination and overall health.
1.Rolling your eyes
Sit up straight, straighten your spine and keep your head still. Move your eyes horizontally from left to right and focus on objects in your periphery. Rotate your gaze three times clockwise in a circle, and then close your eyes to relax them again.
2. “Stretch” for the eyes
Relax your face and keep your eyes closed as you look up and count to four. Now slowly look down—your eyes should still be closed—and count to four again. Repeat this exercise three times before changing it up a bit. The next approach is to look from left to right.
3.Focus
Extend one arm straight out in front of you with your thumb up, focus on your thumb and count to four. Then slowly move your hand towards your nose until your eyes no longer focus on it, and count to four again. Return your hand to the starting position and repeat the same exercise 10 times.
4.Looking far and near
Find two focal points: one in the distance (preferably somewhere outside the window if you're at home), and one much closer to you. Focus on a distant object for a few long breaths, and then move your gaze to an object closer to you.
Wait until your eyes focus on a closer object, then take a deep breath and exhale completely before shifting your focus back to the distant object. Repeat this exercise 10 times.
5.Blinking
Open your eyes wide and then blink quickly 10 times. Close your eyes and take five deep breaths and five slow exhalations. Repeat this exercise five times.
6.Palming
Palming was invented by Tibetan yogis and involves lightly touching the palms of the hands to the eyes. You need to sit with your eyes closed and focus on the darkness. You will soon notice all sorts of flickering lights that are caused by irritation and overload of the optic nerve.
Our eyes need darkness to recover from light. Once these sparks begin to disappear, slowly remove your palms and gradually open your eyes. They may be more sensitive at this point, so don't look at anything too bright right away, let your optic nerve get used to the light.
7.Look closely at the tip of the nose
This exercise is often used in combination with meditation and pranayama (breathing practice) and is called Nasikagra Drishti, which literally translates as “contemplation of the tip of the nose.” Sit in a comfortable position with your back straight. Relax your shoulders and place your palms on your knees for better spinal alignment and concentration.
Now slowly move your gaze to the tip of your nose without straining your eyes. Relax your eyes as soon as you feel discomfort. Repeat five or more times until your eyes feel rested.
Cow Head Pose (Gomukhasana)
Crossing your hips is not as easy as it seems. For those who find this pose difficult, use a pillow or rolled up blanket and place it under your hips.
Technique: Place your left leg on top of your right, cross your knees, and sit between your legs. You need to sit with your back straight. Place your right hand back, behind your head, and your left hand back, below, and clasp your hands together. Hold the pose for up to 10 exhalations on each side.
Sukhasana (comfort pose)
It is convenient to move into this pose from Dandasana. So, you are already sitting upright with your hands in front of you. Now raise your right knee and place your left foot under your right thigh. At the same time, the foot will turn with the sole slightly upward and, as it were, look out from under the right thigh. Now bend your right leg in the same way and tuck your foot under your left calf (not your thigh!).
Your legs will be crossed at the ankles. Place your hands on your knees, straighten your neck and back, and turn your shoulders. Stay in this pose for up to 5 minutes, focusing on deep, measured breathing through your nose.
Wide Leg Forward Bend (Prasarita Padottanasana)
Sometimes simply bending forward can be challenging for those with tight hips and hamstrings.
Technique: Spread your legs as wide as you can.
Place your palms between your legs and slowly step them forward until your elbows touch the floor. Breathe deeply, consciously relaxing tense areas. Hold the pose for 5 to 10 breaths and gradually increase the time you stay in the pose. The more you hold this pose, the faster you will see progress.
King of the Fishes Pose (Ardha Matsyendrasana)
To completely relax and relieve stress before completing your session, include a seated twist in your practice. It stretches the muscles of the lower back, hips, buttocks and spine.
Technique: sit on the floor, place both legs in front of you, bend your left leg at the knee and cross it over your right, so that your foot is on the floor near your right thigh. Then turn your body to the left. Inhale and join your palms in namaste. Hold the pose for three to five breaths. Repeat on the other side.
Yoga poses to relax and relieve fatigue
Child's Pose (Balasana) with support
Sit on your heels, place your knees hip-width apart or slightly wider; let your big toes touch each other. Place a yoga cushion, a couple of pillows or a folded blanket in front of you - the whole thing should not be too soft, it should provide normal support.
Now lean forward and lie with your torso on a blanket (pillows, cushion), turn your head to the side, lower your elbows freely to the floor, palms on the floor, facing forward.
Close your eyes and try to completely relax. Stay in this position for 5 minutes, breathing freely. This is a good yoga pose to relax your back.
Supta Baddha Konasana (variation)
That blanket or pillows (what you were lying on in child’s pose) - now turn your back to them, put any support under your feet (the same pillows), cross your legs in a Turkish style, and lie with your back on the blanket.
Bring your feet together, ankles freely drop down, knees resting on the support. You can place your hands on your stomach, chest, or spread them to the sides - in general, choose any position that is comfortable for you.
Close your eyes, breathe freely and relax for 5 minutes.
Savasana (corpse pose) on the side
So, the situation is the same: lie on your side (whichever side you want), put a pillow under your head. Next, take the same blanket on which you were lying, place it in front of you so that you can place your “upper” leg bent at the knee on it (see picture).
Place your hands as you like, close your eyes, breathe freely. Stay in this pose for 5 minutes. This is a good pose for relaxing the nervous system, and is great to do before bed; although it can be said that all these poses are good for evening practice and as a remedy for insomnia.
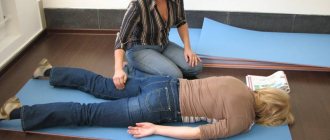
Pigeon Pose (Kapotasana, variant)
This pose is a real lifesaver for weak or tight hips. First you need to provide support for the front of your pelvis (a pillow or bolster will do). Place your right knee, thigh and shin on this pad and extend your entire left leg behind you. Your pelvis should receive equal support on both sides.
Place another pillow or blanket in front of you, lean forward, and place your forehead and hands on it - this will help relax your neck and shoulders.
Breathe deeply, relax your whole body for 5 minutes. Then switch legs and perform the pose again for 5 minutes. A fairly effective yoga pose for relaxing the neck.
Savasana with chest opening
Place a blanket or pillows on the floor (at the length of your spine), sit with your back to them, then inhale, and as you exhale, gently lie down on this support. Extend your legs forward, keeping your feet approximately hip-width apart; spread your arms slightly to the sides, or place them on your stomach or chest (you can have one hand on your heart, the other on your stomach).
Breathe deeply, trying to completely relax; feel how the chest opens, liberates, how the tension goes away. Relax your neck. Perform the pose for 5 minutes.
Shoulder stretch
Place a folded blanket on the floor and lie on your stomach. Extend your arms in opposite directions, crossing them in front of you and placing the outer sides of your forearms and palms on the floor (as in the picture).
The torso rests on a blanket support (to relieve the load from the shoulders), and the arms stretch freely in opposite directions (this can be done by lightly pressing the torso on the elbows, thereby the arms will seem to move apart to the sides).
Perform 1 minute in each direction (i.e. changing hands).
These are the simple yoga poses for relaxation and recovery. In general, they will take up to half an hour to complete; however, with practice, if you learn to relax faster, the time to complete the entire complex can be significantly reduced. By the way, this whole practice can also be considered as evening yoga for relaxation, because... it is good for relieving fatigue and stress.
You can also do not do all the poses, but only some of them that you find most effective or that you simply enjoy the most.