Exercise therapy for cerebral palsy is an important component of complex therapy for a serious illness. Doctors recommend that parents work with their children daily, performing special exercises. They advise turning physical therapy into an exciting game. Such activities will bring pleasure to the child, while simultaneously strengthening his muscles and increasing range of motion. Even when relaxing in the country or going out into nature, you should use your free time to improve your baby’s health. Positive results will not be long in coming - gradually adapting to increasing loads, the child will become stronger and quickly compensate for impaired functions.
The importance of daily exercise therapy
The prognosis for cerebral palsy directly depends on its form of cerebral palsy, timely and continuous rehabilitation therapy. Profound disability is not excluded, but much more often the efforts of doctors and parents are not in vain. Over time, existing movement disorders are compensated. And all thanks to the growing and developing brains of children. It has significant potential and flexibility, so the functions of damaged structures are taken over by healthy areas of brain tissue.
Treatment for children with cerebral palsy is mainly aimed at eliminating symptoms. Doctors prefer to use the term “rehabilitation”. After all, therapy is focused on restoring lost functions. Exercise therapy for children with cerebral palsy is considered one of the most effective methods. Therapeutic exercise helps to normalize muscle tone and improve coordination of movements. That is, it solves problems that pharmacological drugs cannot do. But it is worth considering that the effects will be noticeable if classes are carried out regularly throughout life, including in medical centers equipped with special simulators.
The essence of the diagnosis of cerebral palsy
You may be interested in:Barthel Scale: description, features and application
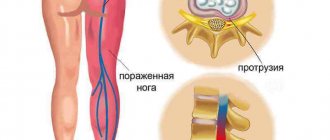
Cerebral palsy (CP) is a chronic disease that does not belong to the group of progressive ones, but requires constant and regular treatment due to pathologies of the brain, in its cortex or subcortical areas, trunk or capsules. This disease manifests itself mainly in the partial physical and intellectual-psychological failure of a person, as well as the inability to fully control his body. This failure is explained by the fact that the patient’s brain does not send a signal to the muscles for motor activity, so he cannot control most of his movements. The reason for this diagnosis is often abnormal intrauterine development, childbirth with complications, birth hypoxia or asphyxia, as well as endocrine or infectious diseases suffered by the mother of a sick baby during pregnancy. Children with cerebral palsy later begin to hold their heads, roll over from back to stomach, sit, and walk. Many of them cannot walk when they are already growing up.
You may be interested in: How to choose a crutch: types, selection options, photos
But there is one positive moment in this whole sad story: cerebral palsy is not a death sentence. There are a lot of different methods, therapeutic measures, various medicinal methods that contribute to the partial restoration of the child’s health and bring him closer to normal functioning.
A timely visit by the parents of a child with cerebral palsy to a neurologist for consultation can contribute to their earlier intervention in the course of the disease process and the rehabilitation of the child’s deplorable state of health through the implementation of certain procedures. Medicine that does not stand still offers all kinds of ways to improve the well-being of a child with this diagnosis in the form of massages, therapeutic exercises, classes on special simulators, physiotherapy, magnetic therapy, electroreflexotherapy, Bobath therapy, the Voight method, classes with speech therapists and psychologists, and the use of auxiliary equipment. And not the last place in this chain is occupied by therapeutic physical education (PT) for cerebral palsy.
Goals of exercise therapy
Therapeutic physical education and gymnastics is a conservative method of therapy indicated for pathologies of the musculoskeletal system, including cerebral palsy. Classes do not replace the use of pharmacological medications and physical procedures. But with their help, you can significantly reduce the doses of medications and minimize their side effects. And most importantly, regular training perfectly develops the ability to voluntarily slow down movements, relax spastic skeletal muscles, improve motor coordination, and increase the range of motion in the joints of the upper and lower extremities.
Montessori program
When turning to such a technique, it is worth remembering that a child with cerebral palsy should develop in normal conditions, and adults should not interfere with him. Teachers in this case play the role of assistants, not teachers. To conduct such a program, it is necessary to use special educational material, thanks to which the child can learn independently. Thanks to the use of the Montessori method, it becomes possible to broaden one's horizons, develop motivation, train memory, independence and many other important skills.
Basic Rules
Only daily exercise can significantly improve the physical and psycho-emotional state of a child with cerebral palsy. You should adhere to the following recommendations from doctors:
- loads must be increased gradually so that the muscles have time to adapt to them;
- sudden, high-amplitude movements must be avoided, otherwise muscle strengthening will be accompanied by microtrauma to tissue;
- You should not try to perform all technical complex exercises during the first training sessions, especially if you are in poor physical condition.
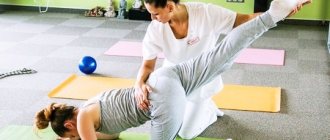
A physical therapy doctor creates an individual set of exercises for children with cerebral palsy. He is always present at all classes, shows how to perform movements correctly, and controls the dosage of loads.
ATTENTION! In addition to training in specialized medical centers, doctors recommend performing some movements at home. Especially those that are difficult for a child.
POOL FOR CHILDREN WITH Cerebral Palsy
Children love water and a baby with cerebral palsy is no exception. Water procedures should not last more than 30 minutes. Muscles do not need overwork. Classes should be regular, preferably on the same day. One-time visits to the pool will not bring any results. All exercises in water are carried out gradually, in combination with other elements.
In any exercise therapy program for children with cerebral palsy, there is a lesson on interaction with water. Tactile sensation is important because babies learn new things.
Adaptive gymnastics
Adaptive physical education is a combination of exercises with proper breathing. At the initial stage of training, children are taught a technique aimed at correctly alternating inhalations and exhalations of equal depth and duration. This allows the child to tune in, mobilize all the body’s resources to fight cerebral palsy, and believe in themselves. And also significantly increase the therapeutic effectiveness of exercise therapy.
During classes, auxiliary equipment is actively used:
- balloons;
- rubber toys;
- liquid for blowing soap bubbles.
When performing physical therapy exercises for cerebral palsy, you need to teach the child to correctly alternate inhalation and exhalation
This approach helps strengthen not only the muscles, but also the entire respiratory system of the child. He must repeat drawn-out vowel sounds after the rehabilitation doctor. Alternating low and high voices helps you master breathing techniques as quickly as possible. The simplest adaptive gymnastics exercise involves inhaling as you raise your arms above your head, followed by exhaling after lowering them.
As the amplitude increases, the movement of the exercise can be complicated as follows:
- stand up straight, straighten your back, bend your arms at the elbows at chest level. Inhale and grab your left shoulder with your right hand, and your right shoulder with your left hand. When performing the exercise correctly, the elbows are at the same point;
- stand up straight, straighten your shoulders. As you exhale, hug yourself by the shoulders, tensing your back muscles. Exhale without changing your body position, then inhale again and bend forward.
The exercises should be repeated 10 times. If you feel dizzy during training, you need to rest for an hour.
Voight technique
The program was named after its creator, who proposed using the reflex of cognition and turns for the purpose of rehabilitating a sick child with cerebral palsy. Each sick child receives individually developed complex exercises that can be adjusted.
A child’s best assistant in the rehabilitation process is a close person whom he trusts.
The main role in the program is given to relatives, since they are the ones who must conduct classes with the patient several times every day. That is why during the rehabilitation period parents must undergo training so that there are no difficulties with training. The healing process based on Voight therapy can be carried out starting from birth. But, parents should be prepared for the fact that the patient will not always be calm during the exercises. Moreover, this is associated, rather, with fear than with the manifestation of pain.
Voight technique in video:
Exercise therapy to restore motor functions
Exercise therapy primarily uses exercises to develop the lower extremities of children with cerebral palsy. After all, due to damage to certain areas of the brain, they cannot walk. Leg problems arise when there is a malfunction of both the central and peripheral nervous systems. In especially severe cases, the child is not able to control his legs and arms at the same time.
Improvement in motor and coordination skills gradually occurs when performing the following gymnastic exercises with the help of parents:
Symptoms of cerebral palsy in children after one year
- put the child on his heels, holding him by the shoulders and pelvis, ask him to kneel;
- in a sitting position on your knees, the baby sways smoothly, learning to move his body to the sides. Over time, the exercise becomes more complicated by lifting one leg off the floor while simultaneously spreading your arms;
- put the child on a chair, fix his legs and pull him by the arms to teach him to stand up without assistance;
- put the baby down, and then, holding him securely, rock him, forcing him to take a step.
A similar set of physical therapy exercises increases motor activity and teaches you to walk without assistance.
Helpful information! Parents often complain to exercise therapy doctors about the long absence of visible results. In fact, the child’s muscles are strengthened, and positive changes occur in the brain. And this significantly increases the likelihood that he will soon take the first step.
Dynamic proprioceptive correction technique
A special feature of this technique is motor rehabilitation using special Graviton devices. This is a design using elastic traction; it is assembled individually for each patient based on clinical studies. It is worth noting that complex training is developed individually based on the existing movement disorder.
Elastic traction allows you to gradually develop muscles
A sick child should approach such therapy only after he or she reaches the age of three; such treatment according to the program lasts about three weeks. Sometimes, for greater effect, the duration of treatment can be increased to one and a half months. Any manipulations within the framework of this method should be carried out only on the strict recommendation of a doctor and under his direct supervision.
Exercise therapy for stretching
Stretching is a set of physical therapy exercises to improve the condition of the back muscles and joints, increasing their strength and at the same time elasticity. It has a general strengthening, tonic effect on the skeletal muscles of the entire musculoskeletal system. Stretching is an important part of the treatment of cerebral palsy. Here are the most effective exercises:
- sit the child on the floor with his back supported, stretch his legs, help him lean forward as far as possible, ideally touching his feet with his fingers;
- Place the baby on his stomach with his arms extended along his body. He should place his palms on the floor and raise his upper body;
- put the child on his back with his arms extended along the body, and then help him bend his knees and pull them to his chest.
Such therapeutic exercises improve the general physical condition of the child with regular exercises. It becomes more mobile due to increased flexibility of the spine.
Stretching exercises for cerebral palsy help strengthen the spine and make the child more flexible
Exercise therapy doctors teach older children to listen to the sensations that arise. If pain appears only when performing a certain movement, then it is temporarily excluded from the complex. If you feel better, you feel warm in your muscles, then the number of hikes increases.
A set of exercises for cerebral palsy
A set of exercises for cerebral palsy
A SET OF EXERCISES TO CORRECT INVALID HANDS POSITION
Frequently encountered pathological disorders include vicious position of the hands caused by spastic muscle tension. In this state, the shoulders are tilted forward, the arms are constantly bent at the elbows, the hand is bent at the wrist joint and adducted, and the thumb is bent and adducted towards the hand. Depending on the extent of the damage, these symptoms may appear simultaneously or partially.
The exercises described below help correct these disorders. You just need to perform them regularly and consistently increase the number of repetitions. The more of them in one lesson - from 20 to 50 times - the faster the correction will come. For example, the exercise is performed 5 times, followed by a short rest of 2-3 minutes, after which the exercise is repeated 5 more times, then rest again. And so on until the required amount is reached. You can divide the load into 2 times - morning and evening. Exercises should be performed slowly, paying special attention to the correct movements. In order for the child to complete the recommended volume, it is better to conduct classes in a playful way. At the initial stage, the total number of exercises performed may be less than 20. Further, the principle of gradualness must be observed.
The child’s hand is the final link in the motor system of the shoulder girdle, where each link exists as an independent unit, and together they form a single whole. Thus, the shoulder and scapula provide rotational movements and forward-backward movements, the elbow joint allows flexion and extension of the arm, and the wrist joint allows flexion, extension and rotation of the hand.
Usually, if one part of a single mechanism does not function correctly, this leads to a change in all the others. Therefore, when correcting the vicious position of the hand, you should perform exercises aimed at normalizing movements in all three joints:
• shoulder,
• elbow,
• wrist.
EXERCISES TO DEVELOP MOBILITY OF THE SHOULDER JOINT AND SCULADES
The most typical case of dysfunction of the shoulder joint is a forward leaning of the torso and adduction of the shoulders due to spastic tension of the pectoral muscles. In this position, it is difficult to perform circular movements in the shoulder joint. To correct this dysfunction, you should first perform exercises to stretch the pectoral muscles and increase mobility in the shoulder blades, then rotate the arms.
* Exercise 1 *
Rotation of the upper body. This exercise belongs to the so-called stretches and helps to stretch the pectoral muscles, which bend the shoulders forward when tense. Lie on your side, bend your knees towards your stomach, and, if possible, extend your arms forward at shoulder level with your palms together. Slowly raise your upper arm, turn your upper body onto your back, turn your head to face up and place your outstretched arm on the other side. The pelvis and bent knees remain in the original position, the shoulder blades should touch the floor. Make sure that the bent upper knee does not move. Maintain this position for 2-3 minutes. Gradually, if this does not work out right away, the outstretched arm will fall down under the influence of gravity. After your shoulders have dropped, return to the starting position, turn on the other side and perform the exercise, turning in the opposite direction.
* Exercise 2 *
Pull your shoulders back. Sitting in a chair or standing (preferably in front of a mirror), independently or forcefully move your shoulders back, bringing your shoulder blades together as much as possible, fix this position for a few seconds, and then return to the starting position.
*Exercise 3*
Exercise with an object. Sitting on a chair, pick up a gymnastic stick or any stick with both hands with an overhand grip (four fingers on top, thumb on the bottom) and place it on your shoulders behind your head. Slowly straighten your arms up from behind your head on your own or forcefully and return to the starting position. When performing an upward movement, bend your lower back. Repeat 10 times, rest and repeat 10 times again.
The same exercise can be performed while lying on the floor, lifting the stick from your stomach up and placing it behind your head on the floor.
*Exercise 4*
Raising your shoulders up, making circular movements with your shoulders. The purpose of this exercise is to increase the mobility of the shoulder blades. Sitting on a chair or riding on a bench, raise and lower first one, then the other shoulder up and down, then both at the same time, trying to keep your shoulders pulled back as far as possible; and shoulder blades brought together as close as possible. Perform rotational movements with the shoulders forward, then back 10 times in each direction. When performing this exercise forcibly, the methodologist or parent sits behind the child and helps him.
* Exercise 5 *
Emphasis on elbows bent at the back. Lying on your back, bend your elbows independently or forcefully, raising your shoulders. Maintain this position for 1-2 minutes.
*Exercise 6*
Rotation of hands. This exercise strengthens the muscles of the shoulder girdle, which are involved in rotational movements of the arms. A strong shoulder girdle is able to resist hip flexion, thereby keeping the torso upright. The exercise can be performed while sitting on a chair or on the lap of an adult if the child cannot walk. Raise your arms independently or forcefully to the sides to shoulder level, making sure that they are at the same level and parallel to the floor. Perform rotational movements with your arms forward, palms down, from 5-10 to 20-30 times. After a short rest, turn your hands with your palms up (either independently or forcefully) and perform circular movements back towards your thumbs.
EXERCISES TO ELIMINATE DEFORMATIONS OF THE ELBOW JOINT
A characteristic feature of pathological changes in this joint is increased muscle tone and flexion position of the forearm, as a result of which the degree of mobility of the arm in space is limited. The purpose of the proposed exercises is to activate the extensor muscles of the forearm, which are in a stretched state. As a rule, such exercises are performed in a static or dynamic mode with the hands and arms resting on the surface.
Straightening your arms at the elbows
There are many variations of this exercise; they can be performed from different positions (standing, sitting, lying down) depending on the severity of the disease. The main task is to extend the arm at the elbow joint to prevent contractures or to reduce existing ones. The greatest effect is achieved when the hands are resting on the floor or wall.
* Exercise 1*
I.P. - lying on your stomach. Bend your elbows in front of your chest and place them, if possible, on your palms. Raising your shoulders up, straighten your arms at the elbows, then bend them again. Repeat 10 times. After a few minutes of rest, perform 10 flexion-extension exercises again. Forced straightening of fingers is unacceptable; if the child cannot place his hands on his palms, the exercise is performed with emphasis on his fists. If you cannot fully straighten your arm at the elbow, you must, holding your arm by the wrist and elbow, force the elbow to straighten and stand in this position for 1-2 minutes.
* Exercise 2*
I. p. - standing on all fours, fingers straightened if possible. Bend your arms at the elbows (push-ups from the floor) and straighten them.
You can do a similar exercise using an oval ball, a large stuffed toy, a bolster, or a pillow. Lie across an oval ball, legs bent at the knees. Pushing off the floor with your feet, transfer the weight of your body to your straightened arms, then push off with your hands and return to the starting position. Perform 10 times, rest and repeat again.
More advanced children can perform a handstand by keeping their legs horizontal. The methodologist slightly raises the child's legs so that he remains on the floor for some time, resting on his hands, then lowers them. The exercise is repeated several times.
With well-prepared children, walking on their hands can be taught and used by slightly elevating their legs.
*Exercise 3*
I. p. - sitting on the floor, palms behind, arms bent at the elbows. Straighten your elbows and return to the starting position. Repeat up to 10 times. After completing the series, clasp your knees with your hands to stretch the working muscles. Then perform the exercise 10 more times.
*Exercise 4*
I. p. - standing facing the wall, push-ups from the wall, or, if the child cannot stand independently while sitting on a chair, push-ups from the back of the chair. The exercise is similar to exercise 2.
EXERCISES TO CORRECT INVALID POSITION OF THE HAND AND FINGERS
With increased tone of the hand flexor muscles, the middle and nail phalanges of the fingers are sometimes in a bent position, and the thumb is bent and brought towards the palm. Performing exercises helps correct deformities. It should be taken into account that it is better to extend the fingers with the arm bent at the elbow, since in this case the muscle tone of the superficial flexor digitorum is less than with the arm extended.
*Exercise 1 *
I. p. - standing on all fours, fingers, if possible, straightened forward. Raise one hand off the floor, then lower it to the floor, resting on the palm. Do the same with the other hand. Repeat 10 times.
*Exercise 2 *
I.p. - standing on all fours. Place your palms with your fingers turned in opposite directions (right-left). Stand in this position for several minutes. Then try placing your hands on your palms with your fingers back.
*Exercise 3*
I. p. - sitting on a chair, the methodologist’s lap, hands in front of the chest, fingers folded. Without opening your fingers, turn your palms outward and hold this position for a while. Place your palms together without opening your fingers. Repeat several times. When performing the exercise forcibly, the methodologist is behind the child and helps him.
*Exercise 4*
I. p. - sitting on a chair in front of a table or wall, arms bent at the elbows. Place the tips of four fingers on the edge of the table or wall and pump your palm with springy movements. Rest and repeat again.
*Exercise 5*
N.p. - sitting on a chair at a table, put your hands on the table and take small dumbbells, sticks or balls in each hand. Raise only the hand with the object with the back side up and lower it onto the table. The forearm lies on the table. After several repetitions, turn your palm up with your fingers and also raise and lower only your hand. This exercise can be performed with each hand alternately or simultaneously, 2-3 series of 6-10 times.
*Exercise 6*
Handle a stretched rope or thick rope with your hands, twist a stick in your palms, twist a towel in your hands, as if wrung out clothes.
When performing exercises with support on the surface, make sure that the hand is placed on the palm.
A SET OF EXERCISES TO DEVELOP MOBILITY OF THE LUMBAR SPINE AND FORMATION OF LUMBAR LORDOSIS
One of the main causes of movement disorders are poor mobility of the lumbar spine and the absence or mild lumbar lordosis. In this case, the child cannot sit, stand or walk correctly. To eliminate the pathology, it is necessary not only to regularly perform exercises, but also to strictly adhere to the requirements for the child’s posture in a sitting position: the legs are bent at the knees at a right angle and rest on the floor or stand, a cushion is placed under the lower back, the back is straight, the head is in an upright position.
Exercises 1-5 are aimed at developing the mobility of each of the five lumbar vertebrae, starting with the first, and are performed in the specified sequence.
Exercises 6-11 contribute to a general improvement in lumbar mobility. All of them are performed independently or forcefully, at first 6 times each, then, as mastery occurs, their number gradually increases to 20.
* Exercise 1 *
I. p. - standing facing the gymnastic wall or the back of a chair and holding on with your hands, feet resting on the floor shoulder-width apart. Squat without lifting your heels from the floor, straight back, head strictly upright, knees bent straight forward, not spread apart or brought inward.
When forced, the methodologist stands behind, fixes the child’s hands and feet and directs the movement of his knees forward.
*Exercise 2 *
I. p. - standing on your own or leaning your back against the wall, feet shoulder-width apart, head straight. Tilts to the right and left, hands slide along the legs. Make sure that the torso and head do not bend forward.
When forced, fix the child’s feet, straighten his knees, and hold his head in an upright position.
*Exercise 3*
I. p. - standing, feet shoulder-width apart, arms bent at the elbows and placed behind the head, elbows to the sides. Turns the shoulders to the right and left with a unidirectional movement of the head; the pelvis does not move. Make sure to move your head and shoulders at the same time and keep your elbows out to the sides.
When forced, fix the child’s feet and pelvis. The methodologist stands behind the child, holding his hands behind his head (if it is difficult to hold his hands behind his head, you can hold them in front of his chest), or sits in front, fixing the child’s feet and hips with his legs, and twists the child’s torso back to the right and back to the left.
*Exercise 4*
I. p. - lying on the mat on your back, legs bent at the knees shoulder-width apart, feet parallel, arms along the body. Raising the knees to the sides and bringing them in.
When performing a forced exercise, the methodologist rests his palms on the child’s knees and helps him complete the exercise.
*Exercise 5*
I. p. - standing, feet shoulder-width apart, back and head straight, heels do not come off the floor. Bend down, reach the floor with your hands. Straighten up, raise your arms up, bend back, bend your head back.
When performing the exercise forcibly, the methodologist sits on a chair and places the child between his legs with his side facing him. Holding the child, he tilts his shoulders down over his leg, raises his shoulders up and bends back, resting one hand on the lower back, and with the other, holding the child’s outstretched arms and moving them back.
*Exercise 6*
I. p. - standing on the mat on all fours. While resting on your palms and knees, bend your back up, lower your head down, arms straight at the elbows - the “cat” exercise. Bend your back down at the waist, head up - “dog”.
When performing this exercise forcibly, the methodologist kneels on the side of the child, fixes the child’s hand with one hand, and with the other helps to arch the back and lower the lower back.
*Exercise 7*
N.p. - standing on the mat on your knees, hands on your forearms on a low support in front, head extended as much as possible. Stretch one leg back with the toe down, the other remains resting on the knee. Raise the straightened leg with the heel up and lower it down onto the toe. Change the position of your legs and perform the exercise with the other leg. From the same starting position, alternately move the leg bent at the knee to the side and bring it up.
When performing these exercises forcibly, the methodologist stands on his knees, fixes the child’s hands on the support with one hand, and helps with the other hand to perform leg movements.
*Exercise 8*
"Half bridge." I. p. - lying on the floor on your back, legs bent at the knees and resting on the floor. Leaning on your shoulders and without moving them, bend your lower back upward; Without lifting your feet from the floor, return to the starting position.
*Exercise 9*
"Frog". I.p. - squat deeply, without lifting your heels off the floor if possible, spread your knees to the sides and place your hands in front between your legs. Rocking forward, lifting your hands off the floor and placing them on the floor. Try to keep your balance.
When performing this exercise forcibly, the methodologist sits behind the child, helps him take a pose and perform the exercise.
*Exercise 10*
I. p. - standing at a table or gymnastic wall, hands on a support. Lifting onto your toes and lowering onto your heels.
*Exercise 11*
Walking on your knees, keeping your torso upright, in any variant.
When performing the exercise, you should use knee pads or walk on a soft carpet so as not to injure your knees. The exercise is performed a small number of times.
EXERCISES TO HOLD YOUR HEAD IN AN VERTICAL POSITION
Most of these exercises are aimed at stimulating the neck extensor muscles, which, due to the nature of the disease, have impaired contractility. In this case, the greatest effect is achieved if the extensor muscles of the neck and lumbar spine are simultaneously involved in the work. As a rule, exercises are performed on the floor using a ball (oval or round) or large soft toys. Stimulation of head extension is achieved by attracting the child's attention to a toy or bright object that falls into his field of vision. In addition, dynamic exercises such as walking, kneeling, or cycling that continually focus on head position are effective.
*Exercise 1 *
I. p. - lying on your stomach on the ball. Rocking back and forth or left and right. Hold the child by the legs, directing his gaze to a bright toy. You can lightly support your head by your chin.
*Exercise 2 *
I. p. - lying on your stomach on an oval ball, arms extended forward. Rocking forward with your hands on the floor and your head raised. After some preparation, you can strengthen this exercise. With your hands on the floor, remove the ball from under the child and hold a handstand with your head raised for a few seconds. In this case, the methodologist holds the child’s legs by the ankles with one hand, and with the other quickly removes the ball and secures the head under the chin.
*Exercise 3*
I. p. - lying on your stomach on a large soft toy or pillow, arms extended forward. Place any toy, book or item of interest in front of the child and leave it there for a few minutes. Monitor your head position and correct its position in a timely manner.
*Exercise 4*
I. p. - lying on your stomach on the floor, arms bent at the elbows and resting on the forearms. Raise your head up, lower it down, turn left and right. Repeat the exercise. Teach to keep your head up, recording the time you hold it.
*Exercise 5*
I. p. - sitting on a chair. Independently or forcefully turn your head to the right, left, lift it up, lower it down, tilt it to the right and left shoulder.
*Exercise 6*
I. p. - sitting on a chair. Bend over, pick up an object or toy from the floor, straighten up and fix your head in a vertical position.
*Exercise 7*
I. p. - standing on your knees, resting your stomach on a sofa or chair. First perform the exercise for a few minutes, then increase the time. The pelvis is in an extended position; do not allow the torso to bend forward, for which you can hold the pelvis with your hand. To maintain the child’s interest, place a book, pictures, toys at his eye level. When performing this exercise, you should place an additional mat under your knees.
Finger gymnastics
The main task of finger gymnastics is to teach the child to perform precise small movements with the hands and fingers and toes. Such motor skills are achieved through the coordinated work of the nervous, muscular and skeletal systems. With cerebral palsy, she is seriously upset, especially if the baby suffers from any visual disorder.
Before preparing for class, you need to massage your hands with soft stroking movements. And then you can start doing the basic exercises:
- move a finger of one hand up and down the palm of the other;
- clench and unclench fists;
- extend your arms forward with clenched fists, and then straighten your fingers one by one;
- touch all fingers of the same hand with your thumb in turn;
- Using the finger of one hand, draw an imaginary circle on the palm of the other.
Exercise therapy doctors recommend developing fine motor skills with the help of objects. Not only will coordination of movements improve, concentration and attention will develop. It is useful to play with sand, sifting it through your fingers, or attach bright clothespins to the edges of a cardboard circle. If one of the parents often bakes, then it is worth involving the child. He must try to make a pie or Easter cake from the raw dough.
High-quality joint development
Children with cerebral palsy experience painful muscle spasms in the joint area from time to time. Therefore, their development is very important - it becomes an excellent prevention of hypertonicity of skeletal muscles. Exercise therapy doctors recommend daily performance of the following joint gymnastics exercises:
- Place the child on the floor and, if necessary, hold him with your hands behind his back. Bend one leg, bring it behind the other, trying to touch the surface with your knee;
- put the baby on his stomach, place a thick thin pillow under the chest. Take it by the handles, pull it up, rocking;
- put the child on his back, bend his legs alternately at the knees, and then straighten them, lifting them up;
- put the baby on his side, keep the knee bent, alternately abduct the hip and then return it to its original position.
Correct breathing rhythm in children enhances the therapeutic effect of gymnastics on joints and helps avoid fatigue. The inhalation should be deep, and the exhalation should be sharp and strong. Movements that require muscle tension should be performed while inhaling, and relaxing ones while exhaling.
Physiotherapeutic procedures and massage go very well with exercise therapy. This combination helps to weaken the clinical manifestations of cerebral palsy, eliminate stiffness, and accelerate recovery.